
Underlays and DXF import
There are two ways to bring another program’s drawing into Drift:
- As an underlay: a PDF or DXF placed behind your sketch to trace over. You can snap to it, but not edit it, and it never prints.
- As geometry: a DXF whose lines, arcs, text, hatches and blocks become ordinary Drift geometry you can edit.
What you’ll do: trace a room from a 1:50 PDF plan, then look at what a DXF import gives you.
Time: about 10 minutes.
Part 1: trace over a PDF
1. Import the PDF
- Choose File → Import underlay… (or Import PDF or DXF… in the Layers panel) and pick a PDF. You can also drop a PDF on Drift’s window.
- For a PDF of several pages, choose the page.
The page comes in at its paper size, with its lower-left corner on the origin, drawn faded grey behind the sketch. The Layers panel opens with the underlay picked.
PDF underlays read the vector drawing: lines, curves, rectangles and filled shapes (as their outlines). Text and images are skipped. Scanned (raster) PDFs have nothing to read.
2. Set its scale
A plan drawn at 1:50 comes in 50 times too small. Either:
-
Pick the scale: in the underlay’s Scale menu, choose the scale it was drawn at, such as 1 : 50 or 1/4” = 1’-0”. Or
-
Calibrate it:
- Click Calibrate….
- Click a point on the underlay whose distance you know, such as a wall end. It snaps.
- Click the other end.
- Type the real distance (
5000, or16'-5") and press Enter.
Drift rescales the underlay about the first point and reports the scale it found.
3. Trace
Draw over it with any tool. Tools snap to the underlay’s end points, midpoints, centres, quadrants and to points along its curves. Your sketch’s own points win when both are close.
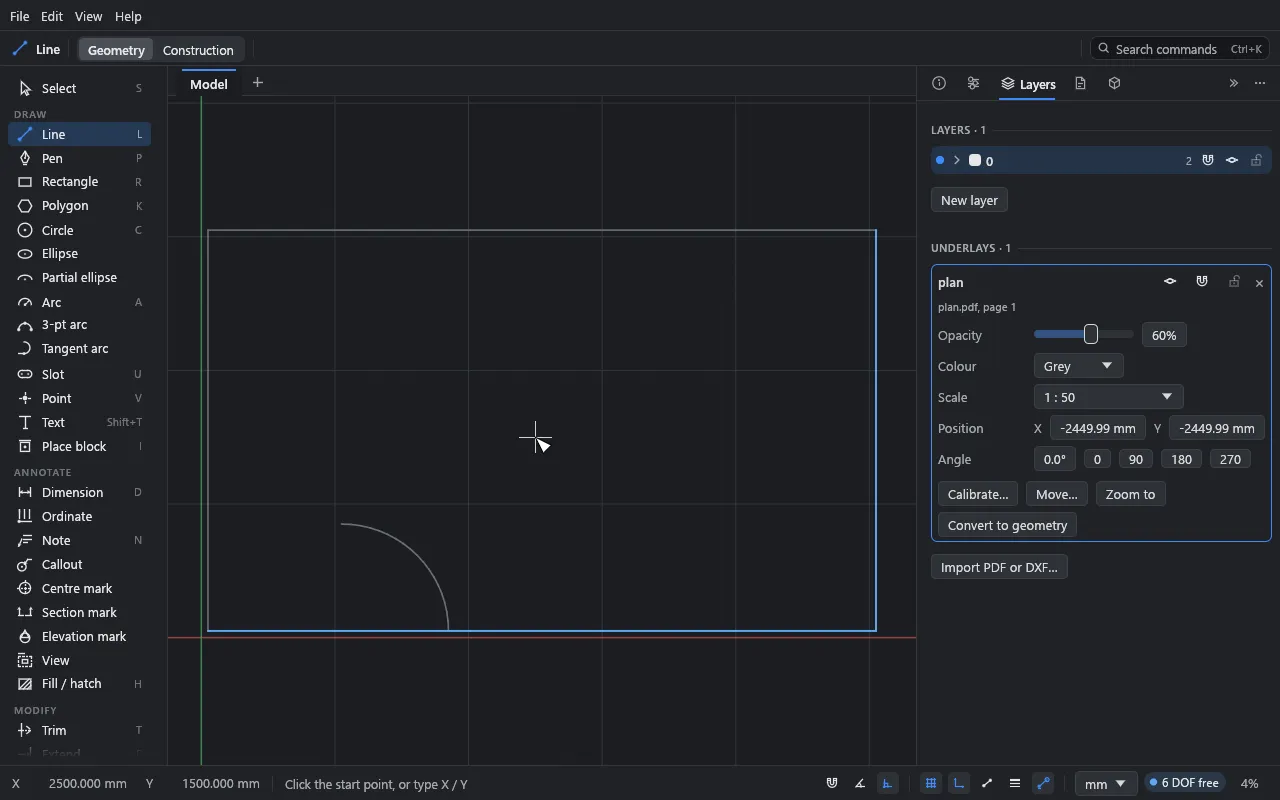
Points snapped on an underlay are new points: they aren’t tied to it.
Underlay settings
Each underlay in the Layers panel has:
- Switches for visible, snap and locked.
- Opacity and Colour (grey by default).
- Scale, Position (X, Y) and Angle (with 0, 90, 180 and 270 buttons).
- Move…: click a point on the underlay, then where it should go.
- Zoom to, and × to delete it.
- Convert to geometry: turn the underlay into lines, arcs and circles on the current layer, with touching ends joined, so you can edit them.
Underlays are kept inside the .drift file. They never print or export.
Part 2: import a DXF as geometry
- Choose File → Import… and pick the file. Or drop a DXF on the window.
- The drawing is added to the open sketch, in its own units (read from the file; a file that doesn’t say is read in your display unit).
- A report window lists what came in, anything left out, and anything read with changes. Copy this report copies it, and Check sketch… looks for gaps (see Checking a sketch).
What comes in:
- Lines, arcs, circles, ellipses, polylines (with arcs) and splines, as Drift curves. Touching ends share points, so outlines stay connected and can be constrained.
- Layers, with their colours, line weights, line types and on / off, locked and plot settings.
- Text and paragraph text, as sketch text.
- Hatches, as live fills.
- Blocks and their inserts, as Drift blocks and copies (nested, arrayed and unevenly scaled ones are expanded into curves).
- Dimensions, as the lines and text they’re drawn with. They look the same but no longer measure.
- Paper-space layouts, as sheets, with their viewports as views.
What doesn’t (yet): associative dimensions, what’s drawn directly on a layout (title blocks, notes), MLEADER, TOLERANCE, images, 3D solids, tables, and binary DXF. DWG files aren’t read: save them as DXF first.
Drift’s DXF export is described in Sheets and output.
Part 3: import SVG, PDF and Illustrator artwork
Drawings made in Illustrator (with or without CADTools), Inkscape, Affinity or Figma, and PDFs
from any CAD program, come in the same way. Illustrator .ai files are read through the PDF
copy of the artwork Illustrator saves in them, so Create PDF Compatible File must have been
on when the file was saved (it is unless someone turned it off). Files from Illustrator 8 and
earlier aren’t read.
- Choose File → Import… and pick an SVG, PDF or
.aifile. Or drop one on the window. - In the dialog, choose:
- Editable geometry or Underlay to trace.
- The page (an artboard, for an Illustrator file).
- Drawn at: the scale the drawing is at on its paper. At 1:50, 1 mm on the paper is
50 mm in the sketch. The dialog shows how big that makes it. Where it can, Drift
suggests a scale and sets it: it reads the drawing’s dimensions (
28 1/2",3'-6",3600) and measures the lines they’re written along, and, failing those, reads the scales written on it (SCALE: 1/4" = 1'-0"). It says which it used, how many agreed, and how confident it is, and names a second scale when some views look to be at one. Architectural sheets often have views at several scales: check the suggestion is the one for the view you want. A scale you’ve chosen is never replaced. - Then calibrate, if you don’t know the scale or want to check it. Once it’s in, click two points on it (a wall’s ends, say) and type their real distance: the import is scaled to fit, about the first point.
- What to do with edges of shapes that are filled but not outlined: construction (they shape the fill and don’t print, so it looks as it did) or lines (they print). Under Before you import, the dialog lists what won’t come across as it looks (gradients, transparency, images left out, clipping it couldn’t apply) and warns about a very large drawing. Above about 400,000 curves it won’t import as geometry: bring it in as an underlay, or split it first.
- A report lists what came in and anything left out.
What comes in:
- Paths and shapes, as lines, arcs, circles and Béziers. Curves that are pieces of a circle come back as true arcs and circles. Touching ends share points.
- Strokes: colour, line weight and dashes (as the nearest Drift line type).
- Fills, as live solid fills in their colour, holes and all.
- Layers: Illustrator’s and Inkscape’s layers, and a PDF’s layers, hidden, locked or non-printing as the file has them. Anything outside a layer goes on a layer named after the file.
- Text, as sketch text, with dimension fractions put back together (
28 1/2"). PDF text in a font that doesn’t say what its characters are (rare) is counted in the report.
Imported artwork has no relations or dimensions: it is free to move and edit, and you add constraints where you want them.
Clipping is applied: what a clipping path, a mask or the edge of the artboard hides is left out, strokes are trimmed exactly where they leave it, and fills are cut to rectangular and other convex clips. A fill crossing a clip of another shape comes in whole, and the dialog says so.
What doesn’t come across: images, gradients (they come in as their first colour, so presentation artwork will look different), transparency, blend modes and soft masks. Illustrator’s brushes, width profiles and effects come in as the filled shapes they draw, and text converted to outlines comes in as shapes. An SVG from Illustrator is read at Illustrator’s size, 72 units to the inch.
Drift’s own SVG export opens well in Illustrator and Inkscape: each layer is a named group (Inkscape shows them as layers; in Illustrator, Release to Layers makes layers of them), and curves that meet are joined into one path.
What you learned
- File → Import underlay… puts a PDF or DXF behind the sketch to trace; calibrate it from two points and a known distance.
- File → Import… brings a DXF in as editable geometry, with a report of what changed.
- An SVG or PDF comes in the same way, as geometry or an underlay, at the scale it was drawn at or calibrated from two points.