
Blocks
What you’ll make: a 12’ × 10’ bedroom furnished from Drift’s block library, and a block of your own. You’ll place copies, turn them as you place them, and edit a block so that every copy updates.
Time: about 10 minutes.
What a block is
A block is geometry drawn once and placed many times, like an AutoCAD block or a Revit family. Each copy has its own position, angle, scale, mirror and layer. Edit the block and every copy changes.
Copies are rigid: they aren’t solved, so a drawing can hold thousands without slowing the sketch down.
1. Draw the room
- Start a new sketch (Ctrl+N), and set the units to ft-in at the bottom right.
- Press R, click a first corner, type
12', Tab,10', and press Enter. - Press Shift+F to fit it in the window.
2. The block library
Open the Blocks panel (the cube icon, at the end of the panel tabs). Under Library,
pick a category: Doors, Windows, Kitchen, Bath, Furniture, or Laundry
and utility. Each family (Door – Single Swing, Base Cabinet, Bed…) shows its
standard US sizes as tiles. The search field at the top searches every category, and the
drawing’s own blocks: try queen or 36 door.
Nothing is added to the drawing until you use it, so the list of the drawing’s blocks stays short. Add all adds every block shown without placing them.
The blocks are drawn to real sizes and clearances in plan, legible at 1/4” = 1’-0”. Swings, glass and bedding are thin lines; wall cabinets and door heads are hidden lines; countertops and vanity tops have a light fill.
3. Place copies
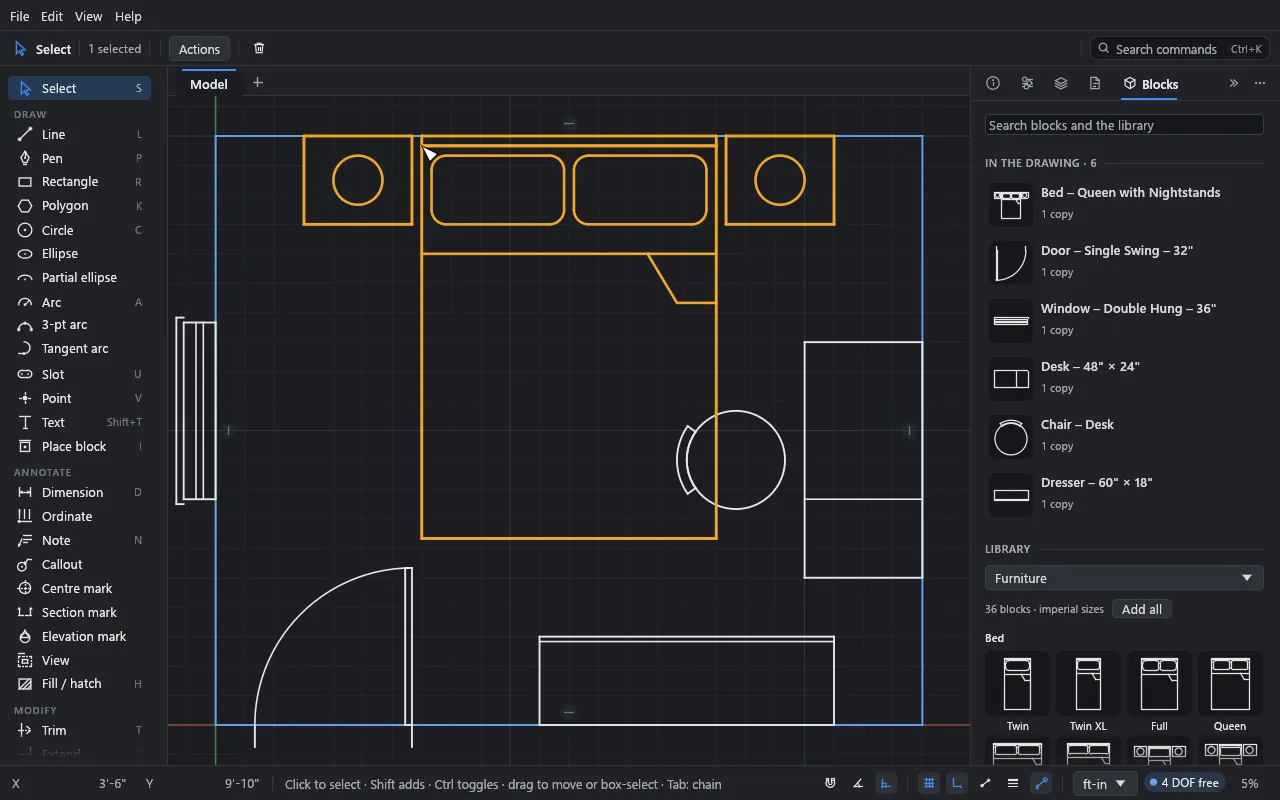
- Pick Furniture and click the Queen with Nightstands tile under Bed. It’s added to the drawing, and the Place block tool (I) starts: a copy follows the pointer, snapping by its base point.
- Click the middle of the top wall to place it. The tool keeps going, so you can place more.
- Search
desk, and click Desk – 48” × 24” (a tile, or the row once it’s in the drawing). Before you click to place it against the right wall, press R to turn it 90°. Press R again for each further quarter turn, and X to mirror it. - Place a Chair – Desk at the desk, a Dresser, a Door – Single Swing – 32” and a Window – Double Hung – 36” the same way.
- Press Esc to finish.
The panel lists how many copies of each block are placed. Purge unused deletes the blocks that have none (Ctrl+Z brings them back).
Base points
Each block is named “Family – Type”, and every type of a family has the same base point, so replacing a copy with another size (Block in the Inspector) keeps it in place:
| Blocks | Base point |
|---|---|
| Doors, openings, windows | The hinge side (or left end) of the opening, on the room-side face of the wall. The wall lies behind the base point, and doors swing into the room. Mirror a door for the other hand. |
| Cabinets, appliances, counters, tubs, showers, washers, dryers, furnaces | The back-left corner, on the wall. |
| Toilets, vanities, water heaters | The middle of the back, on the wall, so they stay on the plumbing line. |
| Beds, sofas, chairs, desks, dressers | The middle of the back (a bed’s head wall). |
| Tables, islands, stools, free-standing tub | The centre. |
Blocks face down in the block (the wall at the top), so turn them with R to face the room.
4. Change a copy
Pick a copy with the Select tool: click its lines or anywhere inside its outline. It moves, turns and copies like anything else (drag, G, R, Shift+D, Delete).
The Inspector shows the copy:
- Block: pick another block to replace this one with it.
- Placement: X, Y, Angle (with 0, 90, 180 and 270 buttons), Scale and Mirror.
- Layer.
- Edit block, Explode (turn the copy back into ordinary, connected geometry) and Select all copies.
Tools snap to copies: to the corners, side middles and centre of each copy’s box, its insertion point, and the ends, middles and centres of its own curves.
5. Make your own block
- Draw something: a 600 × 600 rectangle with a circle inside, for a table and a lamp.
- Pick it all (drag a box round it).
- Under New block at the top of the Blocks panel, type a name (or keep the suggested one) and click Make. You can also use Edit → Make block, or Make block in the top bar’s Actions menu or the right-click menu.
The block’s base point is the middle of what you picked, and a copy takes the geometry’s place. Fills inside the outline go into the block too: each copy fills its area, the hatch turning, mirroring and (for model patterns) scaling with the copy.
6. Edit a block in place
- Double-click a copy (or pick it and click Edit block).
- The copy becomes ordinary geometry, framed as the block being edited. Change it, add to it, delete from it; anything you draw joins the block.
- Press Esc, click outside, or click Finish editing at the top of the Inspector.
Every copy updates.
Right-click a block in the Blocks panel to rename it, select its copies or delete it. Deleting a block deletes its copies.
Blocks and other programs
DXF export writes blocks and their copies as BLOCK and INSERT entities, and DXF import reads them back as blocks. See Underlays and DXF import.
What you learned
- The Library holds doors, windows, kitchen, bath, furniture and utility blocks in standard US sizes; a click adds one and places it. Make turns a selection into a block.
- Clicking a block starts placing it; R turns and X mirrors the next copy.
- Double-click a copy to edit the block; every copy follows.