
Sheets and output
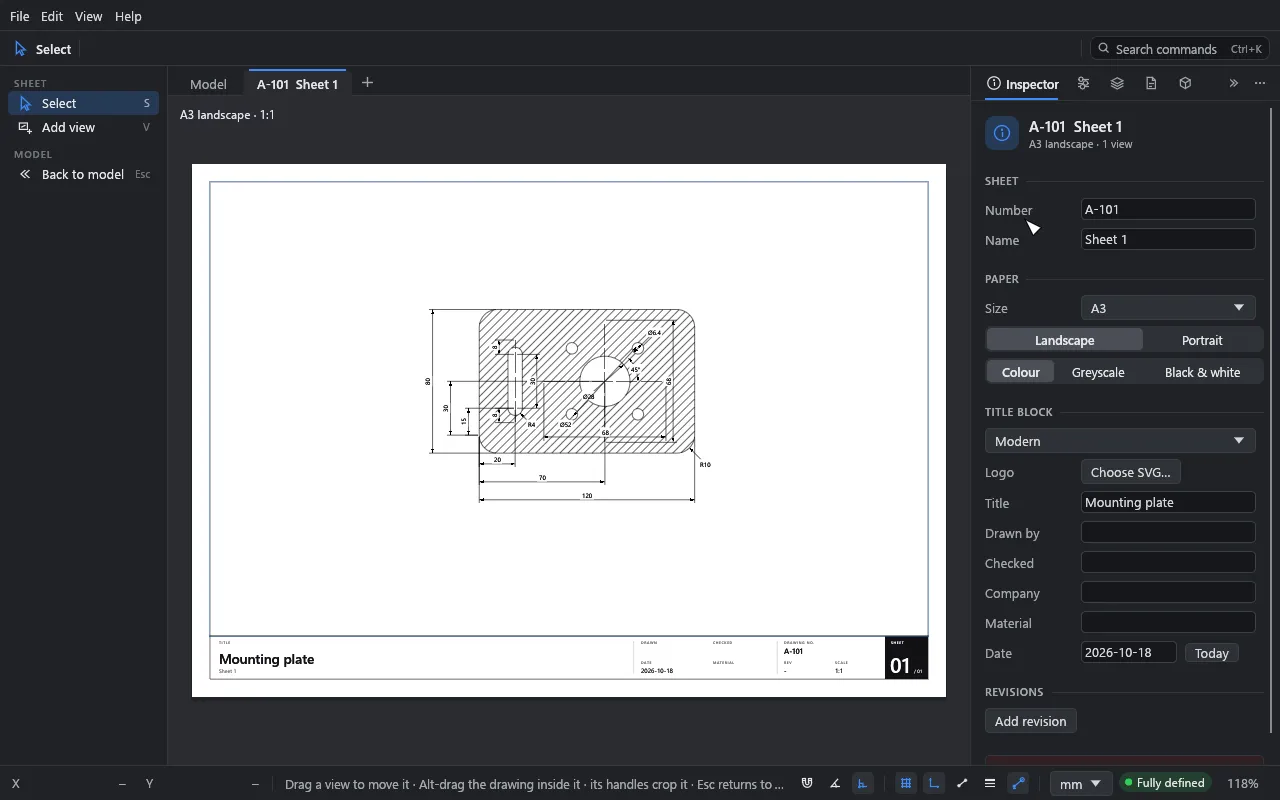
What you’ll make: an A3 sheet of the example plate with a title block, a 2:1 detail of the bore drawn as a view on the canvas and placed on the sheet, and a PDF of it.
Time: about 20 minutes.
The idea
You draw in model space, at full size. A view is a named crop of the model at a scale, like a Revit view with its crop region. You draw it on the canvas, where its crop and name show. A sheet is a piece of paper with a title block. You place views on it, and move them around the paper.
The sheet shows the view, not a copy of it. Reframe a view’s crop, on the canvas or on a sheet, and every sheet it’s on follows. One view can go on several sheets (Revit allows only one). What you see in the sheet preview is exactly what prints.
1. Make a sheet
- Open the example (File → Open example). Hatch the plate if you like (see Fills and hatches).
- Click + in the tabs over the canvas (or New sheet in the Sheets panel).
Drift makes sheet A-101, A3 landscape, with the Modern title block. It also makes a view of the whole drawing, View 1, and places it to fill the drawing area, at the largest standard scale at which the drawing, dimensions included, clears the title block. The sheet is shown, with its settings in the Inspector. The next sheet you make is A-102, and so on.
The tabs over the canvas are the model and each sheet: click one to show it. On a sheet, scroll to zoom, drag with the middle or right button to pan, and press Shift+F to fit the sheet. The rail holds what you can do on paper: Select, Add view and Back to model. Esc, or the Model tab, returns to the model; picking a drawing tool (from a menu or the command palette) takes you back to the model with it.
Sheets are in the order of their tabs, which is the order they print in. To change it, drag a tab (or a row of the Sheets list) to where it should go. Right-click a tab or row for more:
- Duplicate with views: a copy right after it, numbered on (A-101 makes A-102, or the next number free), with its paper, title block and fields, and copies of its views. The copies are views of their own, so you can change them without changing the first. The revisions stay with the original.
- Duplicate empty: the same, without the views.
- Move earlier / Move later, and Delete sheet.
2. Set up the paper and title block
Click bare paper on the sheet (or its title block) and the Inspector shows the sheet:
- Sheet: its Number (A-101), Name and Status (what it’s issued for: type one, or pick For review, For permit, For construction and so on from the menu beside it). Its tab and the Sheets list show the number and name.
- Paper: Size (A4 to A0, ANSI A to E) and Landscape or Portrait.
- Colours: how the sheet prints (see Colour, greyscale or black & white).
- Title block: Modern, ISO 7200, ASME Y14.1 or None. Then the fields: title, drawn by, checked, company, material and date (Today fills it in). The scale, the sheet number (“1 / 2”) and the revision fill themselves in.
- Project settings…: what every sheet shares (see below).
The project
File → Drawing settings → Project holds what every sheet’s title block shares: the project’s Name (the title on every sheet), Number, Client, Address and Company. Your first sheet names the project after the file; change it once here and every sheet follows.
A sheet’s own Title or Company, typed in its Inspector, wins over the project’s. Left empty, the field shows the project’s in grey (”· from project”).
Title block fields says what else the title blocks carry:
- Mechanical: each sheet’s material.
- Architectural: the client, the project number and each sheet’s status, and on paper A3 and larger the address too. Material is left out.
A drawing from an earlier version of Drift, with the same title (or company) on every sheet, opens with it as the project’s.
- Logo: Choose SVG… puts a logo in the title block. It’s kept in the drawing.
- Revisions: Add revision adds a row with the next letter, today’s date and the author. The latest revision shows in the title block.
3. Draw a view on the canvas
- Click the Model tab (or press Esc) to go back to the model.
- Pick the View tool (under Annotate in the toolbar).
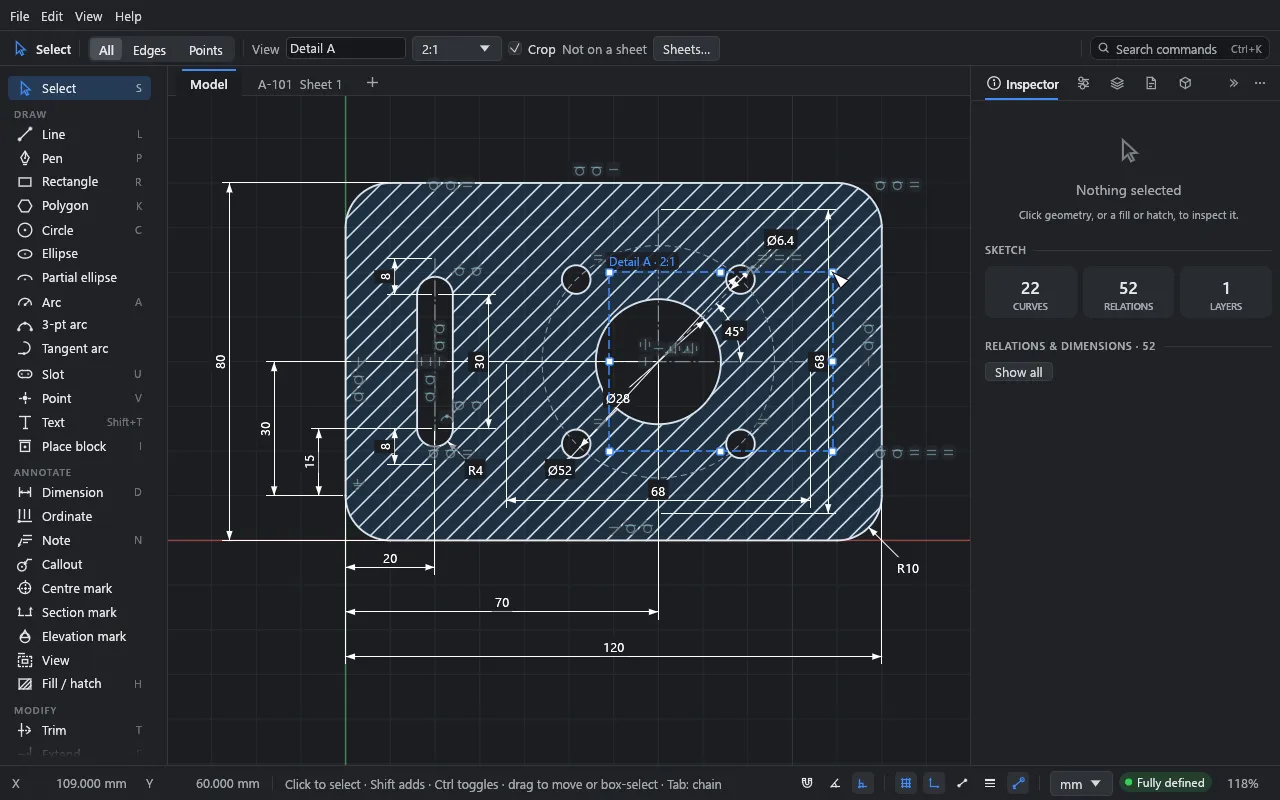
- Drag a rectangle round the bore, or click two opposite corners.
The new view is called View 2, at the scale of the last view made. Its crop shows as a dashed rectangle with its name and scale above it. It’s picked, with grips, and you’re back on the select tool. The top bar shows the view:
- Type
Detail Afor its name, and choose 2:1 from the scale menu.
With the select tool:
- Click a crop’s edge or name to pick its view. Geometry under the pointer comes first, so a crop never gets in the way of picking a line.
- Drag a picked crop’s grips to reframe it, or drag its edge or name to move it.
- Esc, or a click anywhere else, lets it go. Delete deletes the view. If it’s on a sheet, Drift asks first, in the Sheets panel.
Showing and hiding crops
Crops and their names are for working on the canvas. They never print or export.
- View → View crops (Shift+Alt+B) shows or hides every crop.
- A view’s own Crop switch (in the top bar, or the Views list) hides just that one, like Revit’s Crop Region Visible. A hidden crop can’t be picked on the canvas, but you can still pick its view in the list. Its crop then shows faintly while picked.
4. The Views list
The Views section of the Sheets panel lists every view in the drawing, with its scale and the sheets it’s on (or not placed).
- Click a view to pick it. Its crop shows on the canvas with its grips.
- Double-click it, or click Zoom to view, to see its crop in the model.
- For the picked view: Name, Scale, and Show: Crop, Dimensions and Notes. Dimensions and notes are shown or hidden in this view wherever it’s placed.
- Referenced by lists the section and elevation marks that point at the view. Click one to pick it in the model.
- Delete view deletes it. If it’s on sheets, Drift asks first, and deleting takes it off them all. Marks that pointed at it are unlinked in the same step. Undo brings it all back.
5. Put the view on the sheet
- Click the sheet’s tab, A-101.
- Drag Detail A from the Views list onto the sheet, and let go where it should go. You can also click Place on sheet: Drift puts it beside the views already there.
Add view in the rail (or V on a sheet) does both steps from the sheet: the canvas shows the model with the View tool, you drag the crop, and the new view goes on the sheet on free paper, at the largest standard scale that fits there, picked. Esc gives up.
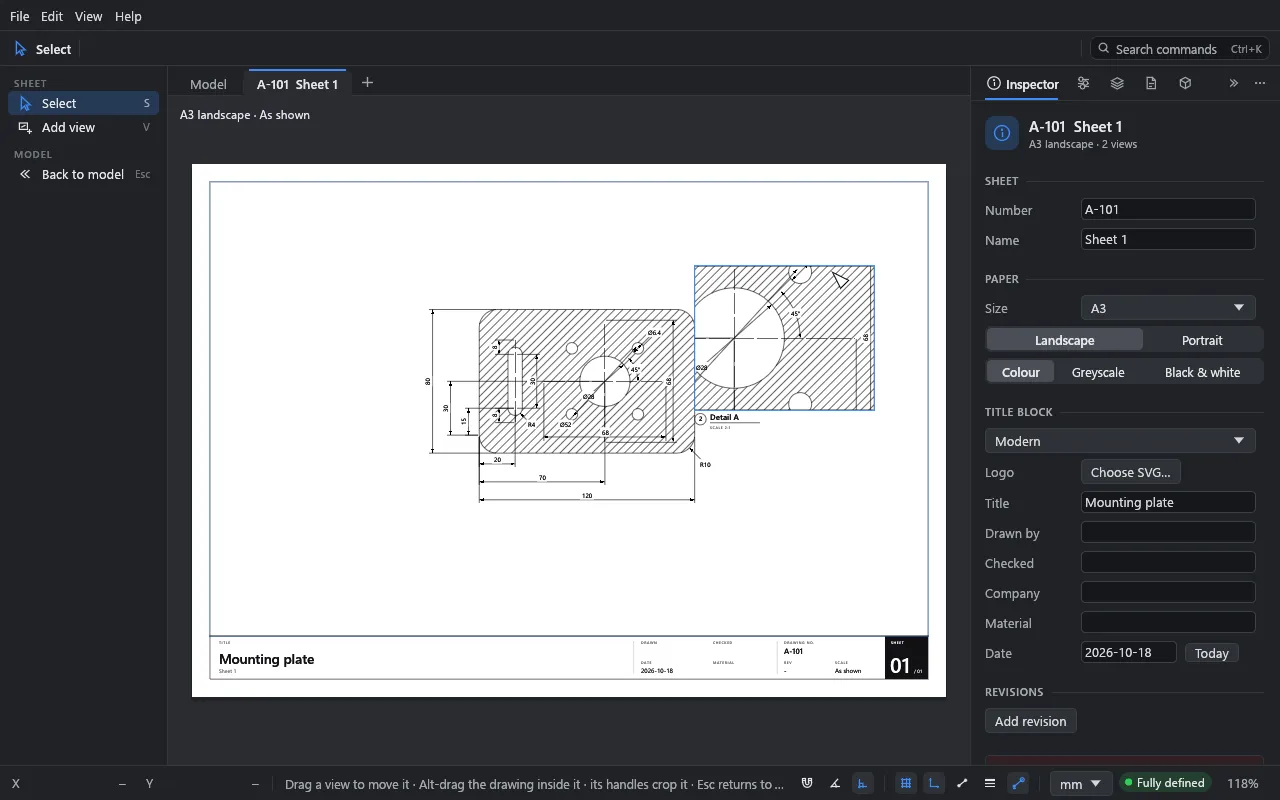
The view goes on the sheet with its title under it. Its frame is its crop at its scale: a 50 × 40 crop at 2:1 is 100 × 80 mm on the paper.
On the sheet:
- Drag a view to move it on the paper. It stays inside the border (hold Ctrl to take it past). A view that fills the drawing area has nowhere to go, so a plain drag on it does nothing.
- Drag its handles to crop it. The drawing stays where it is on the paper, and the view’s crop in the model changes with it.
- Alt-drag inside it to slide the drawing within the frame. This moves the crop over the model.
Cropping or sliding a view changes it on every sheet it’s on, and on the canvas.
Views snap as you drag them: their edges and middles line up with other frames and the drawing area, and drawings at the same scale line up level or in line with each other. Dashed guides show what lined up. Hold Ctrl to place freely.
The views on a sheet
Pick a view by clicking it on the sheet. The Inspector shows the views on the sheet (Views on this sheet), and for the picked one:
- Title: its name. Tick Title under Show to print the name, with the scale beneath it, under the view.
- Scale: choose from the menu. The crop stays as it is in the model, so the frame grows or shrinks on every sheet the view is on. Metric scales run from 10:1 to 1:10000. Architectural scales (3” = 1’-0” down to 1/32” = 1’-0”) and engineering scales (1” = 10’ to 1” = 200’) are offered too, with your drawing’s units first.
- Fit: the largest scale at which the whole drawing fits the frame, centred. The frame stays as it is on the paper, and the crop changes to suit.
- Fill drawing area: frames the view to the sheet’s whole drawing area, after a change of paper size, say.
- Show: Dimensions, Notes, Title and Border.
- Referenced by: the marks that point at the view.
- Layers: untick a layer to leave it out of this view, wherever the view is placed: a setting-out layer in the plan but not in the details, say. Dimensions and notes on nothing but that layer’s geometry go with it. A layer hidden or set not to print in the Layers panel is greyed out here: it’s off in every view.
If the views on a sheet have different scales, the title block’s scale reads As shown.
A view’s number on a sheet is its place in Views on this sheet, from 1. A section or
elevation mark linked to the view reads that number over the sheet’s number (2 / A-101),
on the canvas and in print. When a view is on several sheets, marks read the first one.
See Annotation for Make view.
Align with lines the picked view up with another one: Left, Centre, Right, Top, Middle, Bottom, Drawings level or Drawings in line.
Remove from sheet (in the Inspector, or Delete on the sheet) takes the picked view off the sheet. The view stays in the drawing, in the Views list, to place again. A sheet can be empty.
Drawings from before views
In drawings made before views came in, each view a sheet held becomes a view of its own. It’s named after its title, or its sheet. Every sheet prints as it did. A view that filled a sheet keeps its crop if you change the paper size. Click Fill drawing area to frame it to the new paper.
6. Output
From the Sheets panel’s Output section, or File → Export:
| Output | What you get |
|---|---|
| PDF… | The sheets you choose, one page each, at true scale and true line weights. With several sheets, a dialog lists them: tick the ones to export (All, or This sheet). Each keeps its number in the set (a reissued A-102 still reads 2 / 5). Without any sheets, the drawing fitted to A3. Text stays selectable. |
| SVG… | The current sheet, at true scale, in millimetres. |
| DXF… | The model at full size (not the sheets), with its layers and line types, in the drawing’s units. |
| Print… (Ctrl+P) | Asks which sheets as PDF… does, writes the PDF and opens it in your system’s PDF viewer (a new tab in the browser), to print from there. |
Exporting never replaces your .drift file.
Colour, greyscale or black & white
Under Paper, each sheet has its own colour choice. The sheet preview shows it, and the PDF, SVG and print come out the same:
| Choice | On paper |
|---|---|
| Colour | Layer and item colours, as drawn. |
| Greyscale | Every colour becomes its grey (by how light it is). Light fills stay light and dark ones dark. |
| Black & white | Like a CAD monochrome plot style. Lines, text and hatch lines print black. Solid fills print as their grey, so a dark fill doesn’t hide the lines on it. White stays white: the masks behind dimension text, and lettering knocked out of a dark box (the Modern title block’s sheet number). |
A new sheet starts in Colour. The choice is saved with the sheet. It doesn’t change DXF, which is the model, not a sheet: DXF keeps the layer and item colours.
What goes on paper:
- Construction geometry, points, hidden layers and layers whose print flag is off are left out, and so are the layers a view leaves out (its Layers).
- Views’ crops and names on the canvas are left out. Only the sheet’s frames (with Border) and titles print.
- Dimensions and notes are left out where a view’s Show says so, where they’re set off sheets, or of views they aren’t in (their In views; see Annotation).
- Drafting hatch patterns are sized for the sheet’s scale.
About DXF:
- It’s written as DXF R12, which every CAD program reads. Ellipses and pen curves go out exactly, as ELLIPSE and SPLINE entities. Those are newer than R12: most programs read them, but a strict R12 reader may skip them.
- Blocks go out as blocks (BLOCK and INSERT). Dimensions and notes go out as plain lines and text on a layer called ANNOTATIONS, so they no longer measure. Fills go out as solid triangles.
- To bring DXF in, see Underlays and DXF import. A DXF’s layouts come in as sheets, and each of their viewports as a view.
What you learned
- A view is a named crop of the model at a scale. Draw it with the View tool, and reframe it with its grips.
- View → View crops and each view’s Crop switch show or hide crops. Crops never print.
- Views go on sheets from the Views list. Reframing a view changes every sheet it’s on, and one view can be on several sheets.
- New sheet lays the drawing out on paper with a title block, at a fitting scale.
- PDF prints every sheet; SVG the current one; DXF the model at full size.
- Each sheet prints in colour, greyscale or black & white, as its preview shows.